
If you’re in a place with regular AC power–say a home, cabin, or office–then setting up a Starlink dish is as simple as putting it under an unobstructed sky and plugging it in. It’s easy to take AC power for granted if we’re used to having it. We don’t have to think so much about how much power we’re using, except insofar as it affects our electric bill.
But when we’re in an RV, unless we’re plugged into shore power, power suddenly becomes quite important. The 2nd generation Starlink dish that I’ve been traveling with uses about 60 watts. Since it’s connected to an inverter, let’s call it 75 watts to allow for the inefficiency of the inverter. (If you don’t know, an inverter is a device that converts DC power to AC power. So we use an inverter to connect Starlink, which uses AC power, to the batteries in the van.)
A typical battery in the back of an older campervan like mine might be 60-120 amp hours. Multiply amp hours by volts (12) to get watt hours. So we’re talking about 720 to 1440 watt hours. Then simply divide by 75 watts (how much the Starlink dish uses) to get your runtime in hours: 9.6-19.2 hours. That means that on a fully charged 60-120 amp hour battery, you could run the Starlink dish for 9.6-19.2 hours. (One major caveat with lead acid batteries is that it’s best not to frequently discharge them below 50%, so you’re really looking at half that runtime.)
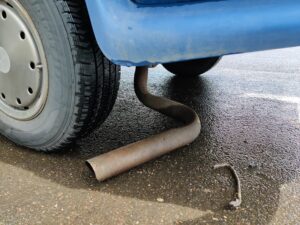
You can see how on an extended trip, you could run into power problems pretty quickly! My van came with a generator, which is great in theory. It used gas from the van’s gas tank, so I never had to fill gas cans. And it provided seemingly endless power. But it was actually quite terrible! It was loud. The exhaust got into the van. And the darn tailpipe kept falling off, even after I had it welded back on to the generator.
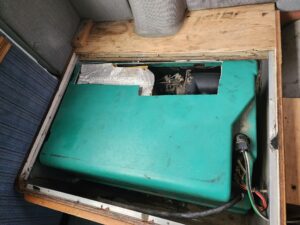
What I decided to do was to remove the generator and install a large Lithium Iron Phosphate Battery. These batteries have many advantages over the older lead acid batteries. They are more energy dense, both in terms of weight and volume. They can be discharged far below 50% without causing problems, giving effectively double the power for the same rated capacity. And compared to older lithium-ion batteries (not lithium iron phosphate), they are much less temperature sensitive and don’t degrade as fast. I expect my battery to outlast the van itself.

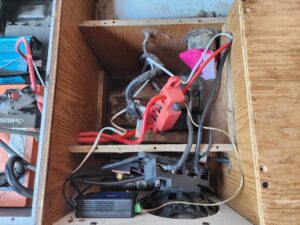
The battery cost $510, but they’re getting cheaper all the time. Above, you can see the battery next to the 2000 watt inverter. On the right is the mess of wires and other supporting components. The better way to do this is to attach the components to the wood, but there wasn’t enough space to do this easily. This area is normally covered anyway, so my only concern is if vibrations might loosen the connections. I will be sure to check every once in a while.
So how long can I run the Starlink dish with this battery? Well, using our previous formula of amps * volts = watts, we can calculate that this 280 amp hour battery will provide 3360 watt hours of power. If the Starlink dish uses 75 watts while it’s on, that’s 44 hours, or more than a typical workweek. That’s pretty good!
But if you’re on a long road trip, you’ll want to be able to recharge your batteries. Three ways to do this (if you don’t have a generator) are plugging the van into shore power; solar panels; and charging off the alternator. I definitely want to install solar panels. In fact, I’m going to try to do that before next summer. But for now, most of my charging happens from the alternator. My van already has a wire running from the alternator to the back of the van where the battery is. I simply connected it and then looked at the battery monitor to make sure it wasn’t drawing more current than the alternator could handle. It rarely charges at more than 20 amps, so it should be fine.
Check out this video. One of the components I installed is a battery monitor that measures how much power is coming into and going out of the battery. Sorry for the bad audio quality (I was driving and charging from the alternator). In the video I say:
Working a full day today, we used 25% of the battery. You can see here with the battery monitor app that we’re charging at almost 20 amps, and that means that we’ll be back at 100% in three and a half hours of driving time.
I absolutely love having a battery monitor. If you upgrade the electrical in your van or RV, you should definitely get one. Without it, it’s hard to know how much power you’re using, how much you have left, or how fast you’re charging. This one cost me less than $100 and works great. It has a small screen that I mount on the wall as well as a phone app that gives me a real-time readout.
In the video below, I give a quick tour of the power setup in the van.
We’re back home in Seattle now! Our trip ended a few weeks ago, but I’m still updating the blog with bit and pieces I wasn’t able to include while on the trip. Coming up next, I’ll show off the timelapse video we made of the entire drive from Anchorage to Seattle.